

Think the Vanquish final boss is unbeatable?
It’s not. With timing and the right positioning you can beat it consistently.
This post shows the exact attack tells, AR windows, cover routes, and weapon choices that turn the fight from chaotic to routine.
Start by clearing barrels and adds, claim the elevator corner, rotate cover on a ten second beat, dodge beams with perpendicular boost-slides, and keep a Heavy Machinegun or Anti-Armor Pistol ready for the final QTE.
Core vanquish game final boss strategies for an Immediate Win

The Bogey fight’s all about setup, then hitting hard when the window opens. Clear every explosive barrel on the landing pad before anything starts. You don’t want accidental deaths or blocked sightlines. Once Candide’s escort robots go down, Bogey wakes up. Your first move matters: dash straight to the container near Candide’s elevator and claim that corner. From there, you’re cycling medium and long-range weapons to chip the boss down while staying mobile enough to dodge beam snipes from the catwalks.
The boss telegraphs heavy attacks with a visible glow and a distinct sound. When you catch that signal, enter AR mode by boost-sliding perpendicular to the beam, then snap back into cover before your AR meter bottoms out.
Around 25 percent health, the game throws a QTE finish at you. Spam the COVER button (Square on PlayStation, X/BLUE on Xbox) to win the melee duel. Equip either a Heavy Machinegun or an Anti-Armor Pistol before you hit this mark, because both let you re-enter AR mode fast if the EMP bomb kills your suit mid-fight. An EMP gust drains your AR meter and locks you out of melee and dashing until it refills. Take an EMP hit? Fall back, let the meter recover to at least 30 percent, then jump back in with a fresh AR window.
The loop’s simple but brutal: keep distance with a Sniper Rifle or assault weapon, swap cover every eight to twelve seconds so lock-on can’t catch you, blow any leftover barrels when the boss or adds cluster near them, and keep your Heavy Machinegun or Anti-Armor Pistol ready for the final QTE. Rocket launchers might spawn in a weapon box, but that’s random. If one shows up, save those shots for when the boss pauses after a beam attack or during a cluster of adds.
Here’s the six-step winning sequence:
- Clear all red fuel barrels and standard R.I. enemies before you destroy Candide’s robots so you’re not fighting on two fronts.
- Take the corner cover near Candide’s elevator, use medium-range weapons to start damage.
- Watch for the boss’s charge-up animation, boost-slide sideways, activate AR to dodge the beam.
- Rotate to new cover every ten seconds because debris falls apart under sustained fire.
- When health drops to roughly 25 percent, keep a Heavy Machinegun or Anti-Armor Pistol equipped, get ready to spam COVER for the QTE.
- If EMP connects, retreat right away, wait for AR meter to climb above 30 percent, then go back to damage.
Weapon Loadouts and Best Gear Choices for the vanquish final boss
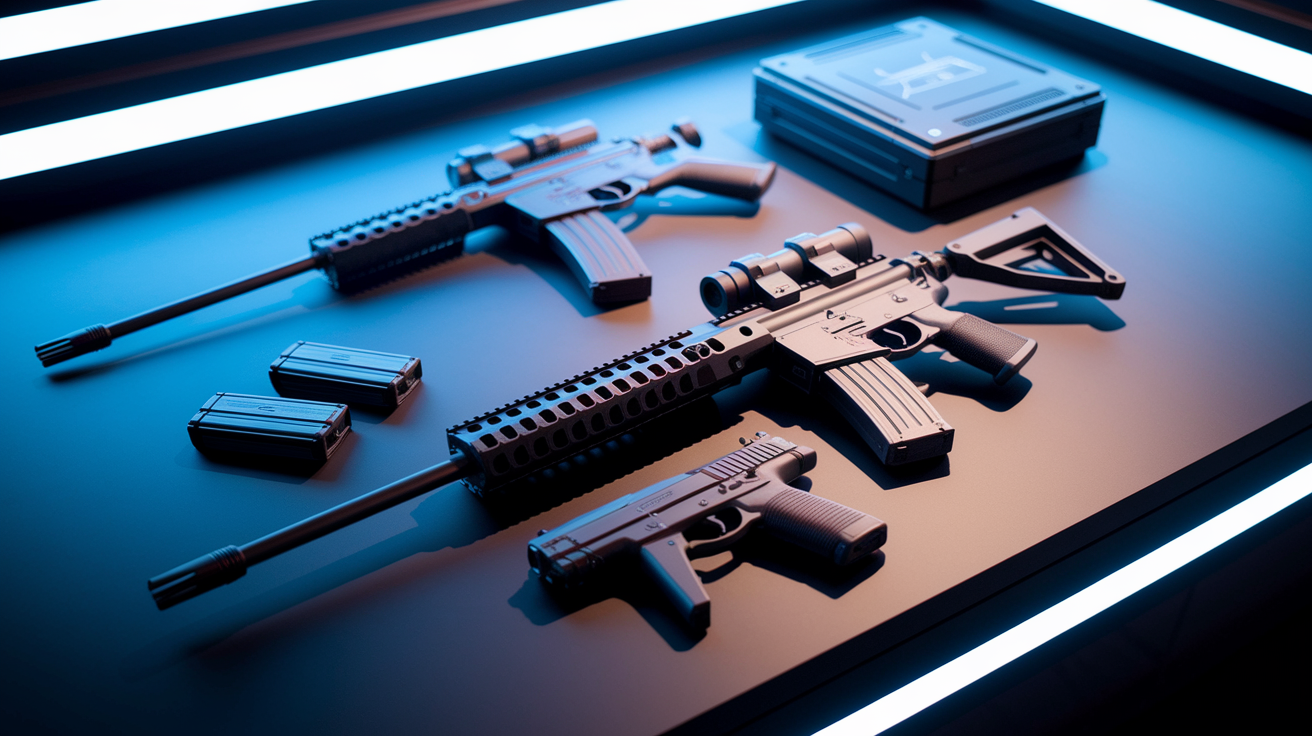
A Sniper Rifle’s your safest damage source. You can peek from distant cover, land consistent headshots, duck back before the boss pivots. Pair it with a Heavy Machinegun or an Anti-Armor Pistol as your secondary. These two do double duty: they let you enter AR mode almost instantly after an EMP drain, and they give you the melee punch you need to transition smoothly into the QTE finish. Without one of these on hand, you’re risking a fumbled button-mash or missed AR recovery timing.
Short-range tools like Shotguns, Disc Launchers, LFE Guns need perfect timing. You can only use them safely after the boss commits to a dive attack, giving you maybe two seconds to counter. Outside that window, closing distance invites beam fire and grenades. The Disc Launcher technically functions as a melee weapon, but on Normal or Hard difficulty the risk outweighs the reward. If a rocket launcher spawns mid-fight, treat it as burst insurance: fire one or two rockets to strip cover or punish the boss during a beam cooldown, then swap back to your rifle to continue sustained pressure.
Bring these four elements into the encounter:
- Sniper Rifle with 100 to 150 rounds for safe peek and fire cycles
- Heavy Machinegun or Anti-Armor Pistol for AR recovery and QTE setup
- Reserve slots for a rocket launcher if the weapon box spawns one
- Avoid relying on short-range weapons unless you can guarantee a dive-attack counter opening
Phase-by-Phase vanquish final boss breakdown
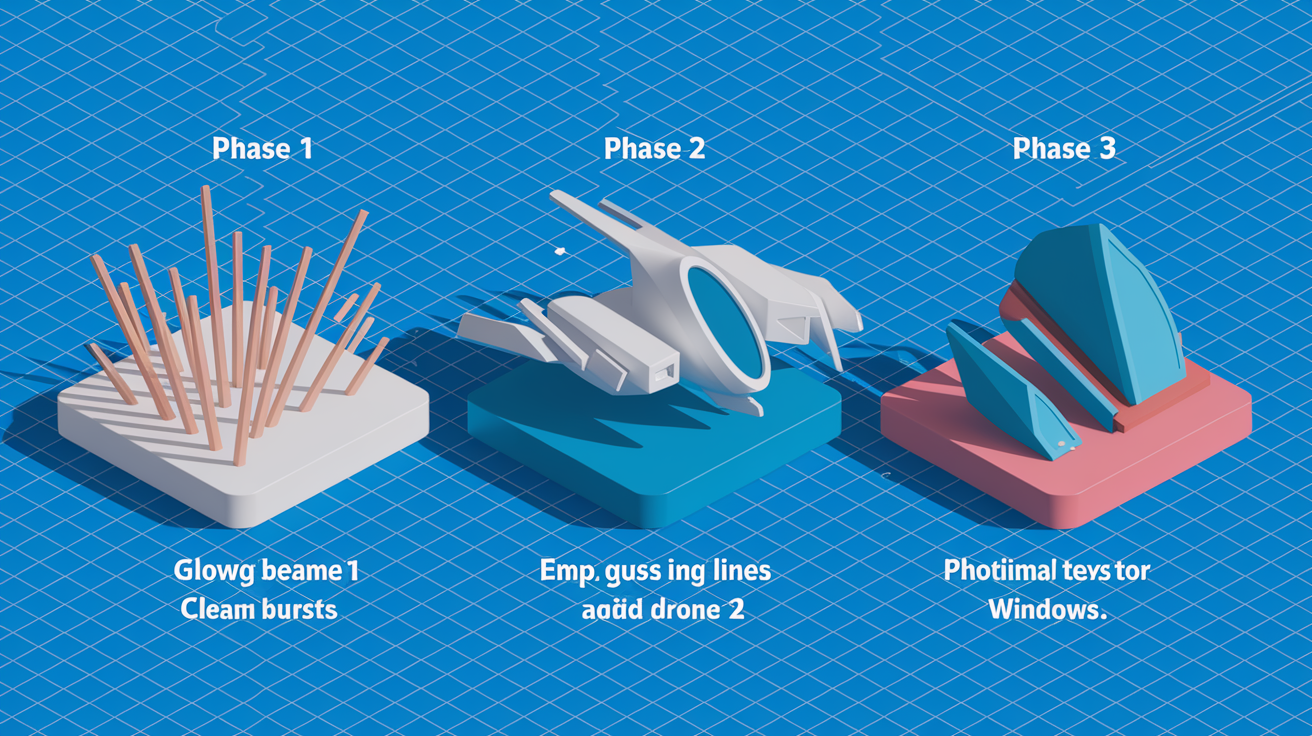
Phase one opens the second Candide’s robots fall. Bogey immediately starts testing your positioning with quick beam shots and grenade lobs. The boss moves constantly, using both ground-level cover and the elevated catwalks around the arena. At this stage, beams come in single bursts with three to four second cooldowns, giving you enough time to peek, fire two to three rifle rounds, duck. Audio cues are your primary warning: a low hum signals an incoming beam, a metallic clang means the boss has repositioned to higher ground. Your job here’s dealing steady chip damage while learning the beam timing and confirming your cover rotation route.
Phase two escalates the moment the boss shifts to sustained aggression. Beam attacks now come in rapid pairs, and the boss starts launching EMP bombs that produce a visible gust effect. The gust drains your AR meter and disables melee and dashing until you recover. During this phase, the boss also calls in additional R.I. units or deploys turret-like drones. These adds pressure you from multiple angles, forcing you to split attention. Prioritize clearing adds with area damage (barrels or rockets if available) before returning fire to the boss. The elevated walkways become sniper perches: the boss will fire down at steep angles, so you’ve got to rotate laterally rather than retreating straight back.
Phase three begins when health drops below 40 percent. Attack frequency spikes, cover degrades in seconds instead of tens of seconds, and the boss alternates between dive attacks and multi-beam sweeps. Windows for safe shooting shrink to one or two seconds. You’ve got to commit to aggressive movement: boost-slide between cover points, use AR to thread shots during beam cooldowns, keep your Heavy Machinegun or Anti-Armor Pistol ready for the upcoming QTE. This phase demands perfect resource discipline because a single EMP hit can trap you in cover with no escape plan.
| Phase | Threats | Counterplay |
|---|---|---|
| One | Single beam bursts, grenade lobs, catwalk repositioning | Establish cover rotation, use rifle for safe peek damage, listen for audio cues |
| Two | Paired beam attacks, EMP bombs, additional R.I. or turret drones | Clear adds first with barrels or rockets, rotate laterally to counter elevated fire, recover AR before re-engaging |
| Three | Dive attacks, multi-beam sweeps, rapid cover degradation | Boost-slide aggressively, use AR to thread one-second firing windows, keep Heavy MG or AAP equipped for QTE |
AR Mode Mastery and Bullet-Time Exploits for the final boss

AR mode activates the instant you perform a boosted slide, slowing time and stabilizing your aim. It’s not a cooldown-based ability. Instead, it eats an AR meter that drains continuously while active and refills slowly when you take cover or avoid movement. Every boost-slide entry gives you roughly three to five seconds of slow-motion before the meter runs dry. The trick’s treating AR as a precision tool rather than a panic button. Enter AR when you’ve got a clear shot lined up or when a beam attack’s mid-flight, use the slow-motion window to sidestep the beam and land two charged rounds, then release AR and return to cover before the meter hits zero.
EMP bombs disrupt this loop entirely. When the gust hits, your AR meter drains to zero and locks, preventing any boost-slide or melee action until the meter climbs back above 20 percent. Equipping a Heavy Machinegun or Anti-Armor Pistol cuts this recovery time in half because both weapons accelerate AR meter refill. If you see the EMP animation begin (a bright flash followed by a visible shockwave), immediately boost-slide away from the origin point. You can dodge the gust if you exit the radius within one second. If the gust connects, retreat to the farthest cover available and wait for the meter to recover fully before attempting any aggressive play.
Use these five principles to control AR efficiently:
- Activate AR only when a beam’s already traveling toward you or when you’ve got a guaranteed two-second damage window.
- Never hold AR for more than four seconds at a time because the meter will drop too low to handle the next emergency.
- After every AR activation, take cover for at least three seconds to let the meter climb back above 40 percent.
- Equip Heavy Machinegun or Anti-Armor Pistol as soon as you see the boss drop below 30 percent health to ensure fast AR recovery before the QTE.
- Practice boost-sliding perpendicular to beam paths rather than directly away, because lateral movement exits the beam hitbox faster and preserves more meter.
Positioning, Cover Routes, and Arena Control in the vanquish final boss fight

The landing pad offers dozens of crate-based cover points, but almost all of them degrade under sustained fire. Treat every piece of cover as temporary. Your movement pattern should look like a triangle: start at your primary cover, rotate to a flank position after one beam cycle, then fall back to a rear position if adds or drones appear. This three-point loop prevents the boss from locking onto a single angle and forces the AI to recalculate targeting every eight to twelve seconds. That recalculation window’s your safe damage opportunity.
Explosive barrels scattered across the arena double as offensive tools. Before the fight begins, identify clusters of two or three barrels and plan detonation angles. When the boss or a group of adds moves near a cluster, fire one round into the nearest barrel. The chain explosion deals area damage, destroys nearby cover (forcing the boss to reposition), and often staggers smaller enemies long enough for a follow-up shot. Use barrels aggressively in phase two to clear turret drones without wasting rockets.
The elevated walkways let the boss fire steep-angle beams that ignore low cover. When you hear the metallic clang of the boss climbing to a catwalk, immediately rotate to cover with overhead protection or move perpendicular to the catwalk’s firing line. Standing still under elevated fire turns you into a stationary target. If no overhead cover exists nearby, boost-slide to the opposite side of the arena and use the movement itself to break the targeting solution. The boss will drop back to ground level after two or three shots, giving you a brief window to reclaim central positioning.
Follow these four positioning rules:
- Rotate every eight to twelve seconds even if your current cover feels safe.
- Detonate barrel clusters early in phase two to control add spawns and force the boss into less favorable positions.
- Move perpendicular to catwalk firing lines rather than retreating directly backward.
- Always have a fallback cover point identified before you commit to a flanking position.
Damage Optimization and DPS Windows for the vanquish final boss

Maximum damage comes from stacking multiple weapon types into a single vulnerability window. The highest DPS rotation starts with a rocket to the boss’s center mass, which triggers a brief stagger animation. During that animation, immediately swap to your rifle and fire three charged shots into the same impact zone. The stagger locks the boss in place for roughly one and a half seconds, and the rifle rounds benefit from the stationary target. As soon as the third rifle shot lands, boost-slide directly toward the boss and execute a melee strike. The slide-melee combo refills a chunk of your AR meter and often extends the stagger by an additional half-second, giving you time to fire one more rifle burst before the boss recovers.
Weapon swap timing’s critical. If you reload your rifle before swapping to the rocket launcher, you waste a full second of the vulnerability window. Instead, fire your rifle until the magazine runs dry, then swap to the rocket immediately. The reload animation for the rocket’s shorter than the rifle’s reload, and you can fire the rocket while the rifle’s still in swap transition. This trick lets you double-dip damage without losing uptime. Practice the sequence in lower-stakes encounters until the swap becomes muscle memory.
Here’s the optimal five-step burst sequence:
- Fire one rocket into the boss’s center mass to trigger the stagger animation.
- Swap to rifle immediately and land three charged shots into the impact zone while the boss is stationary.
- Boost-slide toward the boss and execute a melee strike to refill AR meter and extend stagger duration.
- Fire one additional rifle burst during the extended stagger window.
- Retreat to cover before the boss exits stagger, then wait for AR meter to climb back above 40 percent before repeating.
Common Mistakes in vanquish final boss strategies and How to Fix Them

Fighting both Bogey and Romanov at the same time’s the most common early mistake. This happens if you ignore Romanov during the opening seconds of the encounter. Always confirm Romanov’s eliminated or has retreated before you destroy Candide’s robots. If you trigger Bogey while Romanov’s still active, you’ll face overlapping beam attacks and grenade spam that make safe positioning nearly impossible. The fix is simple: prioritize Romanov first, then turn your attention to Candide’s escorts.
Staying behind degrading cover too long’s the second major error. Players instinctively camp the first piece of cover they find, unaware that debris crumbles under sustained fire. After two or three beam hits, your cover vanishes and you stand exposed. The solution’s disciplined rotation: move to a new cover point every eight to twelve seconds regardless of whether your current cover feels safe. Build the habit of rotating before the cover fails rather than reacting after it collapses.
Allowing EMP to drain your AR meter before the QTE window’s a third critical mistake. If the gust hits when the boss is at 28 percent health, your AR meter locks just as the QTE triggers, leaving you unable to boost-slide into melee range or recover quickly enough to spam the COVER button. Keep a Heavy Machinegun or Anti-Armor Pistol equipped once health drops below 35 percent, and retreat immediately if you see the EMP animation begin. Let the meter recover fully before you push damage into QTE range.
Mis-timing short-range weapons creates unnecessary risk. Players often equip a Shotgun or Disc Launcher and attempt to close distance without waiting for the dive-attack animation. The boss punishes this with a point-blank beam or grenade that strips shields instantly. Only commit to short-range tools after you see the dive telegraph, a two-second wind-up where the boss lowers its stance and charges forward. Use that window to sidestep and counter with a single Shotgun blast, then immediately retreat.
Use this four-step reset protocol when things go wrong:
- Retreat to the farthest rear cover available and break line of sight completely.
- Wait for AR meter to climb back above 40 percent and for shield to regenerate fully.
- Equip Heavy Machinegun or Anti-Armor Pistol to accelerate AR recovery if EMP hit you.
- Re-engage by peeking for a single rifle shot, then ducking back to confirm the boss has reset its targeting priority before committing to a new damage cycle.
Final Words
In the action: you’ve got a clear, usable path — the fight loop, weak-point timing, safe cover tips, and the QTE finish. Use sniper peeks, Heavy MG or Anti‑Armor Pistol for AR and QTE setup, and save rockets for burst windows.
Phase notes, AR mastery, arena control, and DPS rotations all fit together to make the run repeatable.
Practice the reset moves and avoid the common mistakes. Follow these vanquish game final boss strategies and you’ll clear the duel with more confidence and fewer retries.
FAQ
Q: Which game has the hardest final boss?
A: The game with the hardest final boss varies, but many players point to Dark Souls (Nameless King), Sekiro, and Cuphead — all demand precise timing, pattern memory, and flawless execution.
Q: How to beat Walter Sullivan?
A: To beat Walter Sullivan, learn his attack patterns, keep moving to avoid grabs, target glowing weak spots with your strongest weapons, heal after big hits, and exploit brief stun windows for heavy damage.
Q: How to defeat megan in the forest?
A: To defeat Megan in the forest, keep distance, use ranged weapons or traps to force predictable attacks, bait and dodge her lunge, then hit head weak spots while staying near safe cover.
Q: What is the strategy of the final boss in prototype?
A: The strategy of the final boss in Prototype is to study attack patterns, dodge big combos, punish recovery windows with high damage attacks, stay mobile to avoid grabs, and save powerful abilities for exposed moments.
